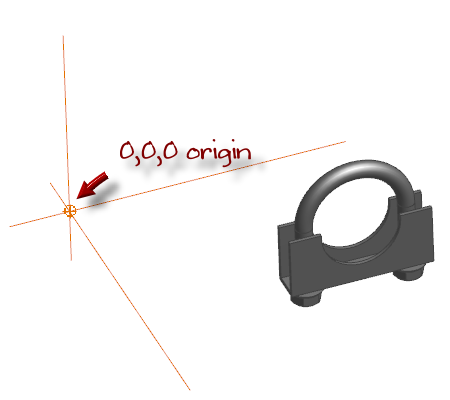
You've imported a part model from a STEP, IGES or some other file format, but find that it was not modeled about the part 0,0,0 origin making it difficult for you to use effectively in your assemblies. Because you intend to use this component over and over again in many many assemblies, you'd like to fix this so that you don't have to deal with the off origin part over and over.
Solution:
To resolve this you can use information in the iProperties Physical tab and the Move Bodies tool. Note the Move Bodies tool was introduced in Inventor 2010, so preceding versions will not have this tool.
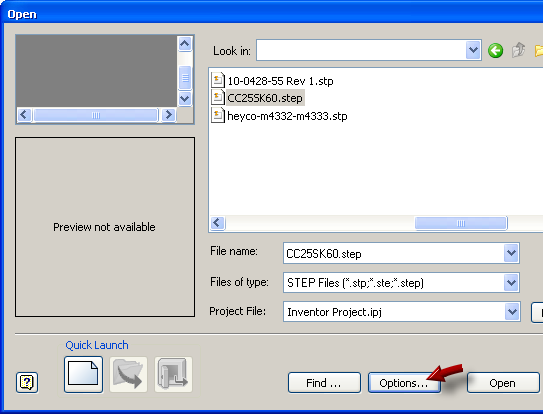
For this example, my part has imported with 4 separate solid bodies, because it was a U-bolt assembly model that I chose to import as a multi-body part file. Recall that you control the way a file imports by clicking the Options button in the open dialog box:
My part has imported with 4 separate solid bodies:

I'll right-click on the top level node in the browser and select iProperties:

In the iProperties dialog box I'll select the Physical tab:

You can look at the physical properties of each body individually to compare them to the entire part:
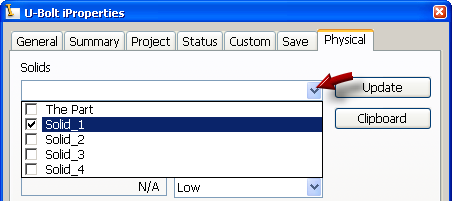
Then click the Update button to update the physical property information. In my example all four of the solid bodies have the same Center of Gravity coordinates as the entire part, so I can use them for all of the bodies:

You can write those coordinates down on a scratch pad and then exit the iPropeties dialog box.
Next go to the Model tab and select the Move Bodies tool from the Modify panel. For the Bodies selection, select all of the bodies to move. In my example I've selected all four. Note that you'll need to click the Bodies button again after selecting the first body to add more bodies to the selection set.
Then enter the Center of Gravity coordinates you copied earlier, and add a negative sign or remove a negative sign to ensure you are moving the bodies back toward the 0,0,0 origin point:

When you click Apply the bodies are moved and a Move Body feature is added to the part browser, allowing you to edit the move co-ordinates if needed.
If you find the accuracy of the coordinates is not close enough, you can go to the Tools tab and select Document Settings. In the Document Setting dialog box, select the Units tab and change it to something such as microns, then set the Linear Dim Display Precision to five places, then click OK.

Now when you query the iProperties the Center of Gravity coordinates will be reported in microns and set out to five decimal places.
But what if you need to rotate the part too?
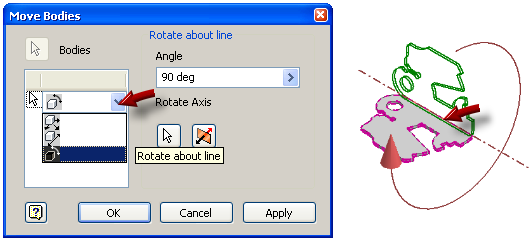
You can also use the Rotate About Axis option to rotate the part and adjust it's orientation:
This method should work with most imported models, but of course you might find exceptions.