Tuesday, October 4, 2011

Level of Details and Assembly Patterns

Issue:
You're trying to create a LOD (Level Of Detail) to use in a drawing and the component you want to show is patterned within the assembly.  You've created the new LOD and suppressed all the parts but the ones you want to show.  But when you try to suppress the elements in the pattern that you do not want to show they then are suppressed in the Master LOD also, and all the parts that are not patterned show up.

Is there a way to do this?

Solution:
If the pattern is being suppressed in the Master LOD, you're confusing the idea of suppressing pattern elements with suppressing the actual components. You want to expand the pattern and suppress the actual part or subassembly, rather than suppressing the element.

Keep in mind that you can pattern multiple components in a pattern so you can suppress them in the LOD individually, whereas if you suppress the pattern element you would suppress them all in the pattern (not just the LOD).

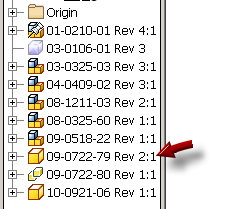
In the screen shot below:
  • Element 3 is suppressed as a pattern element, and is therefore suppressed in the Master LOD as well as the current LOD
  • Element 4 has both patterned components suppressed in the the current LOD
  • Element 5 has just the part suppressed and the subassembly set to its own LOD (called simple) in the current LOD
  • Element 6 has the subassembly suppressed in the current LOD
  • Element 7 has the subassembly expanded and one of the parts within it has been suppressed from the top level assembly in the current LOD, so a local or temporary LOD is created at the top level assembly and denoted by the (~1)


Wednesday, August 17, 2011

Built for Speed: Running iLogic Rules Automatically When Saved, For New and Existing (pre-iLogic) Inventor Files

Issue:
You've created what is possibly the best collection of iLogic rules ever! And you'd like the rules to run on your existing parts, assemblies and drawings when you save them, after making edits and updates. But after a bit of investigation you find that Autodesk hasn't provided a way to run rules on existing (pre-iLogic) files without manually adding an event trigger to each one. Now you must rely on your memory or the memory of your co-workers, to either add an event trigger, or run the rule manually. Is there a better way?

Engine model courtesy of GrabCAD and Terry Stonehocker


Solution:
Jürgen Wagner has posted an add-in created by his colleague that allows you to get very close to the goal of running rules automatically in existing (pre-iLogic) files. It works by running a rule called IPT for every IPT that is saved, a rule called IAM for every IAM that is saved, etc. You can add any iLogic code to these rules, and then it will be run each time the file type is saved.

You can download and install this add-in by visiting Jürgen's blog (written in German) http://inventorfaq.blogspot.com  Incidentally, Jürgen's blog contains some outstanding Inventor tips and tricks besides just this add-in, and I always enjoy checking in to see what he's come up with. So a big thanks for the time and effort to Jürgen.

I'll detail the procedure to set this add in up and get it running for you in the following steps.

  • First, I'll visit Jürgen's blog page and find the dropbox download link to obtain the zip file containing 32 bit and 64 bit versions of the add-in for Inventor 2010, 2011 and 2012 ( here is the direct link also).
  • Next, I'll ensure that Inventor is not open.
  • Then, I'll extract the contents of the zip file and then select and run the version that matches my operating system and Inventor release.  


  • Next  I'll choose the install path (or just accept the defaults). Here is a translated version of the extraction dialog:
  • Once the install is done, I'll start Inventor and go to the Tools tab and click the Add-Ins button to ensure the add-in installed correctly.
  • I'll look for the add-in called MuM iLogic Run on Save, then click OK to exit the Add-Ins dialog box once I've confirmed the add-in is present.
    • Next, with no files open, I'll go to the tools tab and expand the Options panel to reveal the iLogic Configuration button.
    • Then I'll set the path for the folder in which I store my external Inventor rules. Note that this would typically be next to, or under, the project (IPJ) file path.

    • To access the iLogic Browser I need to have a file open, so I'll open any file, or I'll start a new file from any template.
    • Then I'll go to the Manage tab and click the iLogic Browser button.
    • I'll Switch to the External Rules tab, and then click on the top level node and choose Create New External Rule.

    • Next, I'll name the rule IPT as shown. Note that in this screen shot I have several other external rules already created:

    • This will create a rule file called IPT.iLogicVb. The resulting IPT rule will be empty until I add some code. The way the add-in works, is that it runs this IPT rule every time I save an IPT file.
    • Next, I'll repeat this for all of the Inventor file extensions (IPT, IAM, IPN, IDW and DWG), until I have an empty rule for each Inventor file type. Here is my iLogic Browser and the folder containing my external rules, for comparison:

    • Next I'll edit the IPT rule (by right-clicking it in the browser) and then add some code:
     
    • You can add code to this rule as you would any other iLogic rule, but I prefer to use these automatic save rules to call other existing rules. So I'll use the RunExternalRule line to call some of my other external rules when the IPT rule is run:


    • I'll add several rules that I will typically want to run on IPT files when I'm saving them. These can be new or existing IPT files. The basic syntax is:
    iLogicVb.RunExternalRule("Your Rule Name Here")


      Okay, so that's really all there is to it. Now whenever I save any IPT file, the IPT rule is triggered, and in my example, it will run five other rules.

      But what if I don't want the rule to run on every single IPT file I save? For instance I might only want the Export STEP rule to be triggered in certain cases.

      To deal with this, I can add a "skip it" conditional statement that looks at an iProperty flag that is set by another rule. For instance, I might create an external rule called Skip-It, that has this simple line in it:

      iProperties.Value("Summary", "Comments") = "X"


      I can then run the Skip-It rule in any file that I know I don't want a particular rule to run in, and it will write X to the Comments iProperty:


       Then I would set up my Export STEP rule to check for the X in the Comments iProperty, and do nothing if the X is found:


      '---start iLogic ----
      'check for skip it flag
      If iProperties.Value("Summary", "Comments") = "X" Then
      Return
      Else
      ' Get the STEP translator Add-In.
      Dim oSTEPTranslator As TranslatorAddIn
      oSTEPTranslator = ThisApplication.ApplicationAddIns.ItemById _
      ("{90AF7F40-0C01-11D5-8E83-0010B541CD80}")
      Dim oContext As TranslationContext
      oContext = ThisApplication.TransientObjects.CreateTranslationContext
      Dim oOptions As NameValueMap
      oOptions = ThisApplication.TransientObjects.CreateNameValueMap

      If oSTEPTranslator.HasSaveCopyAsOptions _
      (ThisApplication.ActiveDocument, oContext, oOptions) Then
          oOptions.Value("ApplicationProtocolType") = 3
          oContext.Type = IOMechanismEnum.kFileBrowseIOMechanism
          Dim oData As DataMedium
          oData = ThisApplication.TransientObjects.CreateDataMedium
          oData.FileName = ThisDoc.PathAndFileName(False) & ".stp"
      oSTEPTranslator.SaveCopyAs _
      (ThisApplication.ActiveDocument, oContext, oOptions, oData)
      End If
      End If
      '---end iLogic ----

      This is just one example of using a condition to control when a rule is or isn't run, I'm sure you'll come up with your own (probably more sophisticated) conditions.

      Note that the MuM iLogic Run on Save add-in tool is provided "as is" and does not include support or other assistance from MuM, Jürgen, or myself. But I've tested it on Inventor 2010 and 2012 and have found it to work without issue, so give it a try.

      UPDATE:
      Since this was first written, others in the Inventor community have been inspired to improve upon the idea. Here are a couple of links with other tools that can be used to add iLogic rule to existing files as well:
      http://beinginventive.typepad.com/being-inventive/2012/02/injecting-ilogic-code-and-ilogic-event-triggers-automatically.html

      http://beinginventive.typepad.com/being-inventive/2011/10/creating-ilogic-rules-automatically.html

        Tuesday, August 16, 2011

        Drawing Dimensions: Left or Right?

        Issue:
        When placing dimensions on a drawing you find that Inventor seems to place offset dimensions unpredictably, sometimes they land to the right and other times to the left. Inevitably you end up needing to readjust the dimension to the side you intended. Is there a setting for this somewhere?


        Solution:
        The solution to this problem comes from understanding how the selection order influences the placement of the dimension.

        If you select an entity on the left first and then one on the right, the dimension will land on the left:


        If you reverse the selection order, and choose an entity on the right first and then one on the left, the dimension will land on the right:


        It's pretty simple once you're aware of this behavior, but even experienced users can use Inventor a long time without realizing that the selection order influences the dimension placement.


        Note that if you inadvertently choose the wrong direction for the initial placement, no worries. Once you've selected the entities to dimension, and are ready to place the dimension,  you can press and hold the CTRL key to have the dimension text "chase" your cursor, allowing you to redirect the dimension text location on the fly.

        You can adjust the default placement behavior by going to the Tools tab > Application Options button > Drawing tab, and setting the Center dimension text on creation option. If selected this defaults the text to center, or to one side or the other (depending upon selection order) if the text won't fit. The CTRL key overrides this behavior. If this option is deselected, the CTRL key forces the dimension text to the center.

        Monday, August 15, 2011

        iLogic: Replace Revision Level Component

        Issue:
        When you replace revised components in your assembly using the Replace or Replace All tools, you find yourself needing to browse through a lot of folders. You'd like to create an iLogic rule to look at the same folder path as the file being replaced.

        Solution:
        Here is a sample rule that uses the folder path and file name of a selected component to look for the next revision level. The input box defaults to 1+ the selected revision level, but allows the user to input any number. A Yes/No message allows the user to see exactly what file is to replace the selected one. If the file is not found a message is displayed.

        I set this rule up as an External Rule, and run the rule while editing a top level assembly.


        If I've forgotten to pre-select a file to replace I am greeted with a message telling me I must pre-select a component:


        When a file is pre-selected and the rule is run,  I am greeted with an input box asking for the revision level to replace the selected file with. The input defaults to 1+ the value of the selected file's revision level:


        Next a message displays the file path and name of the selected file and the revised file that will replace it:


        When I click Yes, the replacement is made.


        In the event that I enter a revision level that creates a path to a file that does not exist, I receive a message telling me about it:


        Although I've used the file path and name to get the revision level in this example, I could have used the revision iProperty to pull in the revision level as well.

        Here is the example rule:


        '----start of ilogic code-------
        'get currently selected component
        Dim oOccurrence as ComponentOccurrence
        Try
          oOccurrence = ThisDoc.Document.SelectSet.Item(1)
        Catch
          MessageBox.Show("Please select a component before running this rule.", "iLogic")
          Return
        End Try

        Dim doc As Document
        Dim CurFileName As String
        Dim NewFileName As String

        'set the selected item
        oOccurrence = ThisApplication.ActiveDocument.SelectSet.Item(1)

        'get the selected item document occurrence name
        doc = oOccurrence.Definition.Document

        'get the path and file name of the selected item
        CurFileName = doc.FullFileName

        'defines backslash as the subdirectory separator
        Dim strCharSep As String = System.IO.Path.DirectorySeparatorChar

        'set array for each folder name found between backslashes in the source directory path
        Dim oPathItems() As Object = CurFileName.Split(strCharSep)

        'parse the path of the file, to get the folder names
        'Example: N:\12-3456-78\Design Outputs\Rev #
        Dim strDrive As String = oPathItems(0)‘returns N:
        Dim strPN As String = oPathItems(1)'returns: 12-3456-78
        Dim strOutputs As String = oPathItems(2)'returns: Design Outputs
        Dim strOrigRevNum As String = oPathItems(3) 'returns: Rev #
        Dim intOrigRevNum As Integer = Mid(strOrigRevNum,5) 'returns #
        Dim strExt As String = LCase(System.IO.Path.GetExtension(CurFileName)) 'File Extension

        ‘get new Revision Number
        'default input is 1+ the existing revison number, but any number can be input
        Dim strRevNum As String = InputBox("Enter New Rev Number", “iLogic", intOrigRevNum +1)
        if strRevNum = “” Then
        Return
        Else
        End if

        ‘compile new name
        NewFileName = strDrive & “\” & strPN & “\” &strOutputs & “\Rev ” _
        & strRevNum & “\” & strPN & “ Rev “ & strRevNum & strExt

        'check to see if the new revision level file exists
        If(Not My.Computer.FileSystem.FileExists(NewFileName)) Then
        MessageBox.Show(NewFileName & vbLF & “ does not exist.”, "File Does Not Exist")
        Return
        Else
        End if

        'provide feedback of the file replacement and ask if the user is sure
        if MessageBox.Show(“This will replace: “ & vbLF & _
        CurFileName & vbLF & _
          with: “ & vbLF & _
        NewFileName & vbLF & _
          Are you sure?”, _
        "iLogic", MessageBoxButtons.YesNo, MessageBoxIcon.Question, _
        MessageBoxDefaultButton.Button1) = vbYes Then

        ‘Replace all occurences, True = Replace All
        oOccurrence.Replace (NewFileName, True)
        Else
        End if
        '----end of ilogic code-------