Thursday, January 19, 2012

Set Your Drawing View Labels to Use the Model Part Number

Issue:
You'd prefer your view labels to use the model part number (or some other file property) rather than the default "View1", "View2", and so on. Re-naming the view labels manually is tedious and error prone. 


Solution:
You can change the view label default to use an iProperty from the model using these steps:
  • Open a drawing file
  • Go to the Manage tab
  • Click the Styles and Standards button
  • Click the Standard to work with from the top of the tree on the left pane
  • Activate the View Preferences tab in the right pane
  • Click the Edit button for Display field
  • Set the Type drop down to Properties-Model
  • Set the Properties drop down to Part Number (or something else)
  • Click the Add Text Parameter button to add this property to your view label

You can click the image below to enlarge it and see the picks and clicks.

Click to Enlarge


Here is a bit of iLogic Code to set the view name and browser node to the model part number also:


'start of ilogic code
Dim oApp As Application: oApp = ThisApplication
Dim oDoc As DrawingDocument:  oDoc = oApp.ActiveDocument

Dim oSheets As Sheets
Dim oSheet As Sheet
Dim oViews As DrawingViews
Dim oView As DrawingView

oSheets = oDoc.Sheets

For Each oSheet In oSheets
oViews = oSheet.DrawingViews
                For Each oView In oViews
                oModelName = _
                oView.ReferencedDocumentDescriptor.ReferencedDocument.DisplayName
                oPartNumber = iProperties.Value(oModelName, "Project", "Part Number")
            oView.Name = oPartNumber
                Next
Next
'end of ilogic code


Update:
By request here is a rule that adds a custom iProperty to the view label with a dash separator.


'start of ilogic code
Dim oDoc As DrawingDocument:  oDoc = ThisDoc.Document

Dim oSheets As Sheets
Dim oSheet As Sheet
Dim oViews As DrawingViews
Dim oView As DrawingView

oSheets = oDoc.Sheets

For Each oSheet In oSheets
oViews = oSheet.DrawingViews
                For Each oView In oViews
                'capture the current view label
                ViewLabel = oView.Name
                oModelName = _
                oView.ReferencedDocumentDescriptor.ReferencedDocument.DisplayName
                Try
            o_iProp = iProperties.Value(oModelName, "Custom", "My_iProp")        
            'add the the iProperty to the current view label, with a dash separator
                oView.Name = ViewLabel & " - " & o_iProp
            Catch
            'do nothing if error
                End Try
            Next
Next

'end of ilogic code


Thursday, January 5, 2012

Creating a Basic iLogic Rule with an Event Trigger


Issue:
You've found some iLogic code online, but you're not sure how to create a simple rule or have it trigger on a save event. You've found the iLogic tutorials on line, but don't have the time to go through them right now. You really just want to know how to create a simple rule and get it working.

Solution:
Here are some basics to get you going, using some simple example code to update the creation date and author iProperties, as described at this link.

Here is the iLogic Code you'll use:

'set Author iproperty to match the system user name
iProperties.Value("Summary", "Author" ) = ThisApplication.GeneralOptions.UserName
'set the Creattion Date iproperty to the current date
iProperties.Value("Project", "Creation Date" ) = Now
'update the file
iLogicVb.UpdateWhenDone = True


To use this code first create an iLogic Rule:
  1. On the ribbon, click Manage tab > iLogic panel > Add Rule button.
  2. Name the new rule Name-Date.
  3. In the rule text area of the Edit Rule dialog box, simply paste in the code from above.
  4. Click OK to save this new rule.
Next you need to have a couple of text fields that read the iProperties (you'd likely create these text objects in your title block, but for now just create some simple text on your drawing to test this first).
  1. On the ribbon, click Annotate tab > Text panel > Text button.
  2. Click on screen to place the text
  3. In the Format Text dialog box select the Type pull down and choose Properties - Model from the list.
  4. Then select the Property pull down and choose Creation Date from the list.
  5. Then click the Add Text Parameter button (looks like and X with an arrow) to "push" the field to the text box.  
  6. Click OK to create the text.
  7. Repeat these steps for the Author iProperty
Next set the rule to trigger when the file is saved.
  1. On the ribbon, click Manage tab > iLogic panel > Event Triggers button. A dialog box displays the list of available events.
  2. Click the Before Save Document event in the list.
  3. Click Select Rules, or right-click and choose Select Rules from the context menu.
  4. Place a check mark next to the Name-Date rule.
  5. Click OK.
  6. Click OK to close the event list.
Now whenever this file is saved the date and name text fields are updated.
 
Note:
You might also be interested in this post from the guys at the Being Inventive blog:
http://beinginventive.typepad.com/being-inventive/2011/07/plot-date-stamp-in-title-block.html

And this article from Paul Munford:
http://www.augi.com/library/playing-by-the-ilogic-rules 


And this article from Steve Bedder:
http://autodeskmfg.typepad.com/blog/2012/01/working-with-external-ilogic-rules.html


Wednesday, January 4, 2012

Autodesk Inventor iLogic: Sort Browser, Collapse Browser, Return Home, and Zoom All


Issue:
You wish that you had a way to automatically do the following list of general house keeping chores for your assembly files:
  • sort the browser tree in descending order so that part numbers are easier to index and find
  • collapse any browser nodes that have been left expanded in the browser tree
  • return the view to the Home view
  • zoom all
Solution:
Here is an iLogic rule to do these things. You can set this rule up to run anytime a file is closed using the iLogic event triggers.


'-----start of ilogic-----
'sort components in the browser
ThisApplication.CommandManager.ControlDefinitions.Item _
("AssemblyBonusTools_AlphaSortComponentsCmd").Execute

'set a reference to the document
Dim oDoc As Document
oDoc = ThisApplication.ActiveDocument

'Set a reference to the top node of the active browser
Dim oTopNode As BrowserNode
oTopNode = oDoc.BrowserPanes.ActivePane.TopNode
Dim oNode As BrowserNode

For Each oNode In oTopNode.BrowserNodes
' If the node is visible and expanded, collapse it.
If oNode.Visible = True And oNode.Expanded = True Then
oNode.Expanded = False
End If
Next

'Return view to Home view
ThisApplication.CommandManager.ControlDefinitions.Item _
("AppViewCubeHomeCmd").Execute

'zoom all
ThisApplication.ActiveView.Fit
'-----end of ilogic-----


****Edit****


I originally had:

'Return view to Home view
ThisApplication.CommandManager.ControlDefinitions.Item _
("AppForceIsoCmd").Execute


which works in older versions, but I have amended it as follows, based on some feedback from "prachu" on the Inventor forums.

'Return view to Home view
ThisApplication.CommandManager.ControlDefinitions.Item _
("AppViewCubeHomeCmd").Execute


you can also use:


'Return view to Home view
ThisApplication.CommandManager.ControlDefinitions.Item _
("AppIsometricViewCmd").Execute

Tuesday, October 4, 2011

Level of Details and Assembly Patterns

Issue:
You're trying to create a LOD (Level Of Detail) to use in a drawing and the component you want to show is patterned within the assembly.  You've created the new LOD and suppressed all the parts but the ones you want to show.  But when you try to suppress the elements in the pattern that you do not want to show they then are suppressed in the Master LOD also, and all the parts that are not patterned show up.

Is there a way to do this?

Solution:
If the pattern is being suppressed in the Master LOD, you're confusing the idea of suppressing pattern elements with suppressing the actual components. You want to expand the pattern and suppress the actual part or subassembly, rather than suppressing the element.

Keep in mind that you can pattern multiple components in a pattern so you can suppress them in the LOD individually, whereas if you suppress the pattern element you would suppress them all in the pattern (not just the LOD).

In the screen shot below:
  • Element 3 is suppressed as a pattern element, and is therefore suppressed in the Master LOD as well as the current LOD
  • Element 4 has both patterned components suppressed in the the current LOD
  • Element 5 has just the part suppressed and the subassembly set to its own LOD (called simple) in the current LOD
  • Element 6 has the subassembly suppressed in the current LOD
  • Element 7 has the subassembly expanded and one of the parts within it has been suppressed from the top level assembly in the current LOD, so a local or temporary LOD is created at the top level assembly and denoted by the (~1)


Wednesday, August 17, 2011

Built for Speed: Running iLogic Rules Automatically When Saved, For New and Existing (pre-iLogic) Inventor Files

Issue:
You've created what is possibly the best collection of iLogic rules ever! And you'd like the rules to run on your existing parts, assemblies and drawings when you save them, after making edits and updates. But after a bit of investigation you find that Autodesk hasn't provided a way to run rules on existing (pre-iLogic) files without manually adding an event trigger to each one. Now you must rely on your memory or the memory of your co-workers, to either add an event trigger, or run the rule manually. Is there a better way?

Engine model courtesy of GrabCAD and Terry Stonehocker


Solution:
Jürgen Wagner has posted an add-in created by his colleague that allows you to get very close to the goal of running rules automatically in existing (pre-iLogic) files. It works by running a rule called IPT for every IPT that is saved, a rule called IAM for every IAM that is saved, etc. You can add any iLogic code to these rules, and then it will be run each time the file type is saved.

You can download and install this add-in by visiting Jürgen's blog (written in German) http://inventorfaq.blogspot.com  Incidentally, Jürgen's blog contains some outstanding Inventor tips and tricks besides just this add-in, and I always enjoy checking in to see what he's come up with. So a big thanks for the time and effort to Jürgen.

I'll detail the procedure to set this add in up and get it running for you in the following steps.

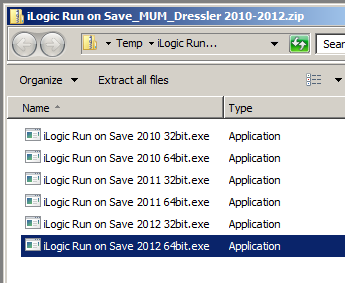
  • First, I'll visit Jürgen's blog page and find the dropbox download link to obtain the zip file containing 32 bit and 64 bit versions of the add-in for Inventor 2010, 2011 and 2012 ( here is the direct link also).
  • Next, I'll ensure that Inventor is not open.
  • Then, I'll extract the contents of the zip file and then select and run the version that matches my operating system and Inventor release.  


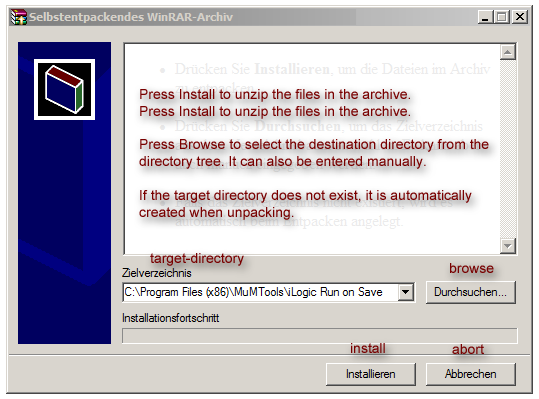
  • Next  I'll choose the install path (or just accept the defaults). Here is a translated version of the extraction dialog:
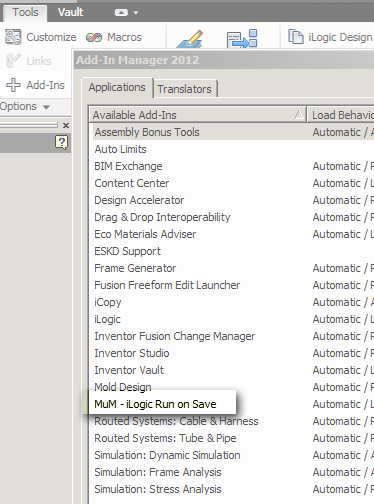
  • Once the install is done, I'll start Inventor and go to the Tools tab and click the Add-Ins button to ensure the add-in installed correctly.
  • I'll look for the add-in called MuM iLogic Run on Save, then click OK to exit the Add-Ins dialog box once I've confirmed the add-in is present.
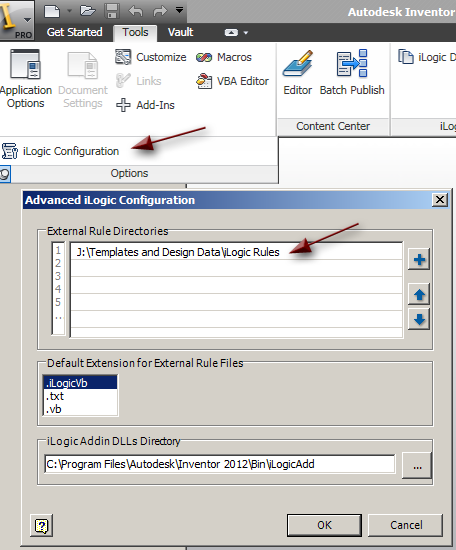
    • Next, with no files open, I'll go to the tools tab and expand the Options panel to reveal the iLogic Configuration button.
    • Then I'll set the path for the folder in which I store my external Inventor rules. Note that this would typically be next to, or under, the project (IPJ) file path.

    • To access the iLogic Browser I need to have a file open, so I'll open any file, or I'll start a new file from any template.
    • Then I'll go to the Manage tab and click the iLogic Browser button.
    • I'll Switch to the External Rules tab, and then click on the top level node and choose Create New External Rule.

    • Next, I'll name the rule IPT as shown. Note that in this screen shot I have several other external rules already created:

    • This will create a rule file called IPT.iLogicVb. The resulting IPT rule will be empty until I add some code. The way the add-in works, is that it runs this IPT rule every time I save an IPT file.
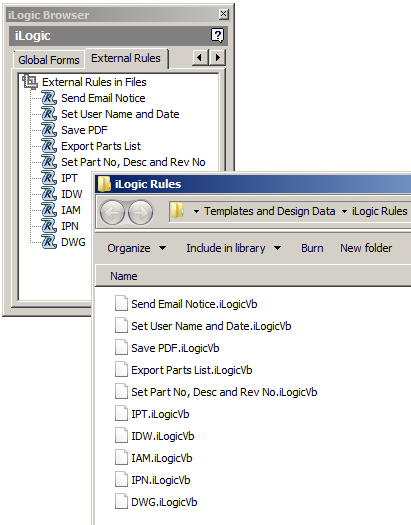
    • Next, I'll repeat this for all of the Inventor file extensions (IPT, IAM, IPN, IDW and DWG), until I have an empty rule for each Inventor file type. Here is my iLogic Browser and the folder containing my external rules, for comparison:

    • Next I'll edit the IPT rule (by right-clicking it in the browser) and then add some code:
     
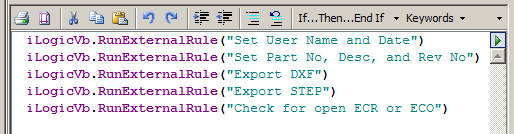
    • You can add code to this rule as you would any other iLogic rule, but I prefer to use these automatic save rules to call other existing rules. So I'll use the RunExternalRule line to call some of my other external rules when the IPT rule is run:


    • I'll add several rules that I will typically want to run on IPT files when I'm saving them. These can be new or existing IPT files. The basic syntax is:
    iLogicVb.RunExternalRule("Your Rule Name Here")


      Okay, so that's really all there is to it. Now whenever I save any IPT file, the IPT rule is triggered, and in my example, it will run five other rules.

      But what if I don't want the rule to run on every single IPT file I save? For instance I might only want the Export STEP rule to be triggered in certain cases.

      To deal with this, I can add a "skip it" conditional statement that looks at an iProperty flag that is set by another rule. For instance, I might create an external rule called Skip-It, that has this simple line in it:

      iProperties.Value("Summary", "Comments") = "X"


      I can then run the Skip-It rule in any file that I know I don't want a particular rule to run in, and it will write X to the Comments iProperty:


       Then I would set up my Export STEP rule to check for the X in the Comments iProperty, and do nothing if the X is found:


      '---start iLogic ----
      'check for skip it flag
      If iProperties.Value("Summary", "Comments") = "X" Then
      Return
      Else
      ' Get the STEP translator Add-In.
      Dim oSTEPTranslator As TranslatorAddIn
      oSTEPTranslator = ThisApplication.ApplicationAddIns.ItemById _
      ("{90AF7F40-0C01-11D5-8E83-0010B541CD80}")
      Dim oContext As TranslationContext
      oContext = ThisApplication.TransientObjects.CreateTranslationContext
      Dim oOptions As NameValueMap
      oOptions = ThisApplication.TransientObjects.CreateNameValueMap

      If oSTEPTranslator.HasSaveCopyAsOptions _
      (ThisApplication.ActiveDocument, oContext, oOptions) Then
          oOptions.Value("ApplicationProtocolType") = 3
          oContext.Type = IOMechanismEnum.kFileBrowseIOMechanism
          Dim oData As DataMedium
          oData = ThisApplication.TransientObjects.CreateDataMedium
          oData.FileName = ThisDoc.PathAndFileName(False) & ".stp"
      oSTEPTranslator.SaveCopyAs _
      (ThisApplication.ActiveDocument, oContext, oOptions, oData)
      End If
      End If
      '---end iLogic ----

      This is just one example of using a condition to control when a rule is or isn't run, I'm sure you'll come up with your own (probably more sophisticated) conditions.

      Note that the MuM iLogic Run on Save add-in tool is provided "as is" and does not include support or other assistance from MuM, Jürgen, or myself. But I've tested it on Inventor 2010 and 2012 and have found it to work without issue, so give it a try.

      UPDATE:
      Since this was first written, others in the Inventor community have been inspired to improve upon the idea. Here are a couple of links with other tools that can be used to add iLogic rule to existing files as well:
      http://beinginventive.typepad.com/being-inventive/2012/02/injecting-ilogic-code-and-ilogic-event-triggers-automatically.html

      http://beinginventive.typepad.com/being-inventive/2011/10/creating-ilogic-rules-automatically.html